Before You Automate: Understanding HTML & DOM
Welcome to a brand new learning block focused on Web Fundamentals for Testers! Before we dive into powerful UI automation tools like Selenium or Playwright, it's absolutely crucial to understand our target: the web page itself.
Remember, all web communication operates on a client-server model, where your browser (the client) initiates a request, and a web server responds. This lesson focuses on what happens in your browser once that HTML response arrives.
We'll explore HTML, the language that provides the content and structure, and the DOM, which is the browser's live, interactive working model of that structure. Getting these fundamentals right solves most UI test automation headaches.

The Web's Skeleton – Understanding HTML
HTML (HyperText Markup Language) is the standard markup language for creating web pages. It's not a programming language; instead, it uses a system of elements (defined by tags) and attributes to structure content and give it meaning. Every piece of text, every image, every button you see on a web page is an HTML element.
Core HTML Concepts
- Elements (Tags): HTML documents are composed of elements, typically defined by a start tag and an end tag (e.g.,
<div>...</div>,<p>...</p>). Some elements are self-closing (e.g.,<img />,<input />). - Attributes: Tags can have attributes that provide additional information about the element. Attributes are placed inside the start tag as
name="value"pairs (e.g.,<input type="text" id="username">). These attributes are incredibly important for finding elements in automation! - Nesting: Elements can be nested inside one another to create a hierarchical structure, defining parent-child relationships (e.g., a
<div>containing several<input>elements).
Basic HTML Document Structure
Every well-formed HTML document follows a basic structure:
<!DOCTYPE html> <!-- Document type declaration -->
<html lang="en"> <!-- The root element of an HTML page -->
<head> <!-- Contains meta-information about the HTML document (e.g., title, links to CSS) -->
    <meta charset="UTF-8">
    <meta name="viewport" content="width=device-width, initial-scale=1.0">
    <title>My Web Page</title>
</head>
<body> <!-- Contains the visible page content -->
    <h1>Welcome to the App!</h1>
    <div id="login-form">
        <label for="username">Username:</label>
        <input type="text" id="username" name="user">
        <button type="button" class="primary-btn">Submit</button>
    </div>
    <p>Need help? <a href="/contact">Contact Us</a></p>
</body>
<html>
Common HTML Elements for Testers
You'll frequently interact with these element types in UI automation:
<div>,<span>: Generic containers for grouping and styling content.<input>: For text fields, passwords, checkboxes, radio buttons (typeattribute is key here).<button>: Clickable buttons.<a>: Hyperlinks.<p>: Paragraphs of text.<h1>to<h6>: Headings of different levels.<img />: Images.<table>,<tr>,<td>,<th>: For structuring tabular data.<textarea>: Multi-line text input.<select>,<option>: Dropdown lists.
Understanding HTML is the absolute first step to knowing what you're trying to automate.
The Browser's Internal Map – The DOM
Your web browser doesn't directly work with the raw HTML text file. Instead, when it loads an HTML document, it parses that text and builds a live, interactive, tree-like structure of objects in your computer's memory. This structure is called the DOM (Document Object Model).
Think of it this way: HTML is like the static blueprint on paper – it's just text. The DOM is the actual 3D, interactive model that an architect builds from that blueprint, which you can physically interact with. Every HTML element (like a <div> or an <input>) becomes a "node" in this DOM tree, and these nodes have properties and methods that JavaScript (and your automation tools!) can use to manipulate them.
// A simplified DOM tree representation for our example HTML:

Document (root)
└── html
    └── head
        └── title ("My Web Page")
    └── body
        └── h1 ("Welcome to the App!")
        └── div (id="login-form")
            ├── label (for="username")
            │   └── Text "Username:"
            ├── input (type="text", id="username", name="user")
            └── button (type="button", class="primary-btn")
                └── Text "Submit"
        └── p
            └── Text "Need help? "
            └── a (href="/contact")
                └── Text "Contact Us"
How Browsers Build the DOM
The process of transforming raw HTML into the interactive DOM is fundamental:
- Receive HTML: The browser receives the raw HTML content (from a server's HTTP/S response).
- Parse HTML: The browser's HTML parser reads the HTML code byte by byte, tokenizes it, and then builds the DOM tree based on the HTML elements and their nesting.
- Discover Resources: As it parses HTML, the browser discovers references to external resources defined within the HTML, such as:
- Linked CSS files (in
<link>tags). - JavaScript files (in
<script>tags). - Images (in
<img>tags) and other media assets.
- Linked CSS files (in
- Fetch and Process: The browser fetches these resources. It then processes the CSS (to build the CSS Object Model) and executes JavaScript code. These steps, which define how elements look and behave, are covered in detail in separate lessons. The DOM itself represents the structured content from HTML, ready to be styled and manipulated.
This live DOM is what your UI automation tools (like Selenium or Playwright) truly interact with. If JavaScript dynamically changes the page after it loads (e.g., adds a new button or updates text), it modifies this DOM tree directly, and your automation "sees" those changes.
"Inspect" vs "View Source"
In your browser, you'll see two options if you right-click on a page:
- View Page Source: This shows you the raw, original HTML file that the server sent to your browser. It's static and doesn't include any changes made by JavaScript. ❌
- Inspect (or Inspect Element): This opens the browser's Developer Tools and shows you the live DOM tree. It's an exact representation of the page at this very moment, including any dynamic changes. ✅
As a test automation engineer, you should always use "Inspect" to understand the page structure you're working with. It's your single most important tool for debugging UI tests.
Why This Foundation Matters for UI Automation
Now that you understand what HTML is and how the browser constructs the DOM from it, let's connect this directly to your work as a UI automation engineer. This foundational knowledge is paramount for writing effective and maintainable tests because every automation tool, whether it's Selenium, Playwright, or anything else, doesn't "see" a webpage the way you do. It doesn't see a pretty blue button with rounded corners. It sees code.
To bridge that gap between human perception and automation logic, you need to think like the tool – how it parses, locates, and interacts with elements within the DOM. Here are the key concepts that make this connection clear:
- Locator Foundation: HTML elements and their attributes (like
id,class,name,type,data-*attributes) are the primary targets for creating your locators. These are the "addresses" you give your automation tool to tell it exactly where to find an element on the page. - Interaction Point: All actions your automation performs – clicks, typing text, selecting dropdown options, hovering – happen on specific elements within the DOM. You need to understand the element's type and its attributes to interact with it correctly.
- Debugging Element Issues: If your test fails because an element can't be found or interacted with, your first step in debugging will always be to inspect the live DOM (using browser developer tools) to see if the element is there, if its attributes have changed, or if it's nested differently than expected.
- Test Data Context: Often, important test data (like product prices, order numbers, or user names) might be embedded within specific HTML elements on the page. Understanding the DOM allows you to extract this data reliably for assertions or further test steps.
Understanding HTML and the DOM is the indispensable first step for mastering any web UI automation tool. It's the blueprint you'll always refer back to.
Quick Practice – DOM Inspection
- Open any web page in Chrome/Edge/Firefox.
- Press F12 to open Developer Tools and switch to the Elements tab.
- Enable "Select an element in the page to inspect it" mode.
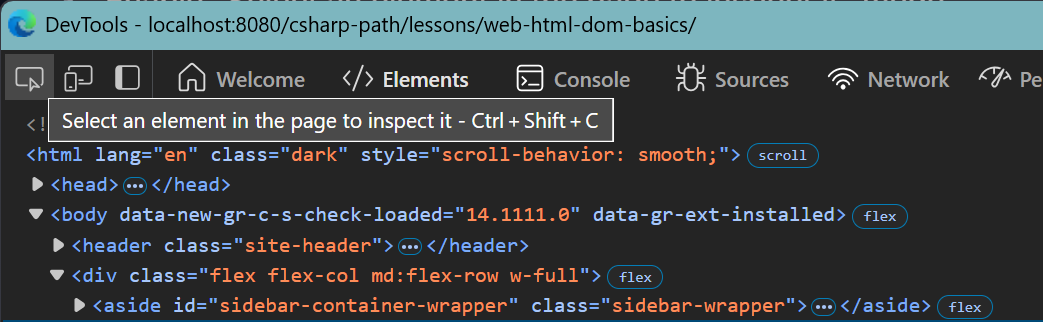
- Hover over elements in the DOM tree – you'll see them highlighted on the page.
- Try right-clicking an element in the page and selecting Inspect to jump to its DOM node.
- Check how the Attributes appear (
id,class,data-*), and note what would make a good locator for automation. - Try editing a value (like button text) directly in the DOM via DevTools to see live updates – just like JavaScript or your test automation would do!
HTML vs DOM
Key Takeaways
- HTML provides the structure and content of a web page using elements (defined by tags) and attributes.
- The DOM (Document Object Model) is the browser's live, interactive, tree-like representation of the HTML document in memory. UI automation tools directly interact with this DOM.
- Browsers parse raw HTML into this dynamic DOM, and in doing so, discover references to CSS and JavaScript.
- Understanding HTML elements and the DOM is foundational for creating robust locators and interacting effectively with elements in UI automation tests.
Deepen Your HTML & DOM Knowledge
- MDN Web Docs: Structuring Content with HTML Comprehensive HTML tutorial.
- Chrome DevTools: Get started with viewing and changing the DOM Learn the basics of viewing and changing a page's DOM using Chrome DevTools.
- MDN Web Docs: How Browsers Load Websites A more detailed technical deep dive into browser loading and rendering.