Taking the Wheel: An Intro to Selenium WebDriver
Welcome to the cockpit. Up until now, you've been the mission planner – studying the terrain (HTML), the atmospheric conditions (CSS), and the physics of movement (JavaScript). You've learned how to use your instruments (DevTools) to understand the world you're about to enter. Now, it's time to take the controls.
This lesson is all about the ignition sequence. We are moving from theory to practice, from observation to action. Our goal is to go from an empty code editor to watching a browser bend to your will, controlled by the C# code you write. This is the moment where all the foundational knowledge clicks into place.
Let's write some code and make a browser dance. 🤖

What is Selenium WebDriver?
At its core, Selenium WebDriver is an API – a library of commands and interfaces – that acts as a universal remote control for web browsers. It provides a common language that allows your C# code to command Chrome, Firefox, Edge, or Safari to perform any action a user could, from clicking buttons to filling out forms.
The Architecture Triangle
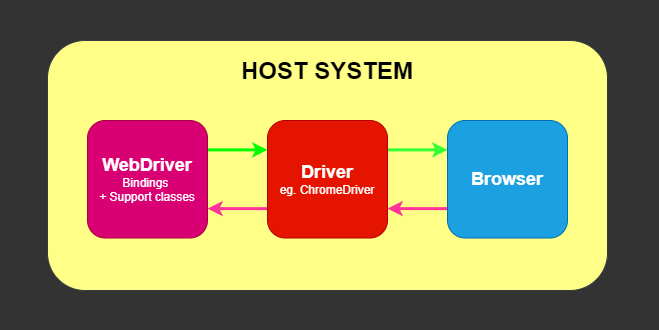
To understand how Selenium works, it's crucial to understand the three components that communicate to make the magic happen:
- 1. Your Test Script (The Client): This is your C# code. When you write a command like
driver.Navigate().GoToUrl("..."), your code creates a JSON payload representing that command, formatted according to the W3C WebDriver protocol. - 2. The Browser Driver (The Server): This is a small executable file (like
chromedriver.exeorgeckodriver.exe) that acts as a bridge. It's a tiny web server that listens for the JSON commands from your script. - 3. The Browser (The Application): The driver receives the command, translates it into the browser's native automation protocol, and instructs the browser to execute the action. The browser then performs the action and sends the result back through the driver to your script.
Understanding the Communication Flow
When you execute driver.FindElement(By.Id("username")).SendKeys("test"), here's what happens behind the scenes:
- Your C# code serializes the command into a JSON HTTP request.
- The request is sent to the WebDriver server (e.g., chromedriver) running locally.
- The driver translates this into browser-specific automation commands.
- The browser executes the action (finding the element and typing text).
- The result flows back: browser → driver → your C# code.
This client-server architecture, standardized by the W3C WebDriver Protocol, is what makes Selenium so powerful. It decouples your test code from the browser, allowing the same script to drive different browsers with minimal changes.
Selenium's Place in the Industry
Selenium is the bedrock of open-source UI test automation. It was the pioneering project that proved reliable, code-based browser automation was possible, and it has been the industry standard for over a decade. A vast number of companies, especially large enterprises, have mature, mission-critical test suites built on Selenium.
Market Reality and Job Opportunities
Understanding Selenium's market position is crucial for your career:
- Enterprise Dominance: Many Fortune 500 companies have significant Selenium-based test automation infrastructure.
- Legacy System Support: Many organizations are maintaining and extending existing Selenium frameworks rather than migrating.
- Cross-Language Flexibility: Selenium supports C#, Java, Python, Ruby, and JavaScript, making it versatile for diverse tech stacks.
- Community Ecosystem: Decades of community contributions mean extensive documentation, tutorials, and third-party extensions.
Foundational, Not Obsolete
You may hear Selenium referred to as a "legacy" tool compared to newer frameworks like Playwright (which I'll cover in a later block). It's more accurate to call it foundational. While newer tools have built-in features that simplify certain tasks, the core challenges of UI automation – locators, waits, and page objects – are universal. Mastering them with Selenium provides you with a deep understanding that is transferable to any tool.
The Learning Transfer Advantage
Concepts you master in Selenium translate directly to other tools:
- Locator strategies work similarly across Playwright, Cypress, TestCafe, and other tools.
- Page Object patterns are universal best practices.
- Wait strategies apply to any asynchronous UI automation.
- Test architecture principles remain consistent.
Learning Selenium first gives you the hard-earned wisdom to appreciate the innovations in modern frameworks.
Learning Selenium is a crucial and highly marketable skill. It makes you a more versatile engineer, qualifies you for a huge number of jobs, and gives you the perfect context for appreciating the innovations of modern frameworks.
Setting Up Your Mission Control
For this and all future practical lessons, we will be working from a dedicated course repository. This ensures you always have a working, runnable copy of the code at every stage of its evolution.
Get the Course Code
The complete code for this course is hosted on GitHub. You'll need to clone it to your local machine.
- Open a terminal or command prompt.
- Navigate to the directory where you want to store your projects.
- Run the following command:
git clone https://github.com/jongrey/test-automation-space-selenium-csharp.git - This will create a new folder named
test-automation-space-selenium-csharp. Open this folder in your file explorer. Inside, you will find a project folder for this lesson named01-basic-script.
Building From Scratch (Optional)
While I recommend using the provided repository, you can also build the project from scratch. To do so:
- Create a new project in Visual Studio using the NUnit Test Project (.NET) template
- Use the NuGet Package Manager to install these essential packages:
Selenium.WebDriver(the core WebDriver API).NUnit3TestAdapter(enables Visual Studio Test Explorer integration).Microsoft.NET.Test.Sdk(test platform runtime).
The provided repository includes additional configuration and helper methods that we'll use in later lessons.
The Magic of Selenium Manager
In the past, the single biggest headache of setting up Selenium was managing browser drivers. You had to manually download the correct version of chromedriver.exe for your specific Chrome version, place it in your project, and update it every time Chrome updated. It was a fragile and tedious process.
This is no longer necessary.
Since Selenium 4.6.0, a new tool called Selenium Manager is built directly into the Selenium.WebDriver library. When your code calls new ChromeDriver(), Selenium Manager automatically performs the following steps in the background:
- It detects the version of Chrome installed on your machine.
- It checks a local cache to see if the corresponding driver is already downloaded.
- If not, it automatically downloads the correct driver version.
- It makes the driver available to your test session.
Understanding Driver Compatibility
Selenium Manager solves a complex compatibility matrix:
- Chrome 120.x requires ChromeDriver 120.x
- Firefox 115.x requires GeckoDriver 0.33.x
- Edge 120.x requires EdgeDriver 120.x
Previously, a single browser update could break your entire test suite until you manually updated the driver. Selenium Manager eliminates this fragility by maintaining the compatibility automatically.
Verify Your Setup
Before proceeding, let's verify your environment is ready:
- Open the solution in Visual Studio.
- Build the entire solution (
Ctrl+Shift+B). - Open Test Explorer (
Test → Test Explorer). - You should see the test methods listed and ready to run.
If you encounter build errors, check that you have the latest .NET SDK installed and that all NuGet packages restored successfully.
This is a massive quality-of-life improvement. You no longer need to manage any driver executables manually. If a tutorial tells you to download a driver, it is outdated. Selenium now handles this for you.
Your First Automated Script
Our target for this block will be Sauce Demo, a live e-commerce site built for automation practice. Our first test will perform a simple, successful login.
Open the 01-basic-script/BasicScript.csproj project in Visual Studio and look at the LoginTests.cs file. This is our baseline – a simple, self-contained script that we will refactor and improve in the coming lessons.
using OpenQA.Selenium;
using OpenQA.Selenium.Chrome;
using NUnit.Framework;

namespace BasicScript
{
    public class LoginTests
    {
        private IWebDriver _driver;

        [SetUp]
        public void Setup()
        {
            // This single line initializes the Chrome browser.
            // Selenium Manager runs in the background to handle the driver.
            _driver = new ChromeDriver();
        }

        [Test]
        public void SuccessfulLoginTest()
        {
            // 1. Navigate to the website
            _driver.Navigate().GoToUrl("https://www.saucedemo.com/");

            // 2. Find the username element by its ID and type in the username
            IWebElement usernameInput = _driver.FindElement(By.Id("user-name"));
            usernameInput.SendKeys("standard_user");

            // 3. Find the password element by its ID and type in the password
            IWebElement passwordInput = _driver.FindElement(By.Id("password"));
            passwordInput.SendKeys("secret_sauce");

            // 4. Find the login button by its ID and click it
            IWebElement loginButton = _driver.FindElement(By.Id("login-button"));
            loginButton.Click();

            // 5. Assert that the login was successful by finding a known element on the next page
            IWebElement inventoryContainer = _driver.FindElement(By.Id("inventory_container"));
            Assert.IsTrue(inventoryContainer.Displayed, "Login was not successful, inventory page not found.");
        }

        [TearDown]
        public void TearDown()
        {
            // This is crucial to close the browser and end the session cleanly.
            _driver.Quit();
        }
    }
}
Deep Dive: Code Breakdown
IWebDriver _driver;: This declares a variable to hold our browser instance. TheIWebDriverinterface is what allows our code to work with any browser. This abstraction is key to Selenium's cross-browser capability.[SetUp]: This NUnit attribute marks a method that runs before each test. We use it to create a fresh browser session for every test, ensuring test isolation.[Test]: This marks the actual test method. NUnit will discover and execute any method with this attribute._driver.Navigate().GoToUrl(...): This is the command to open a specific webpage. Unlike clicking a link, this directly instructs the browser to load the URL._driver.FindElement(By.Id("...")): This is the core command for locating an element. We use theByclass to specify our locator strategy (in this case, byId). This returns anIWebElementinterface..SendKeys("..."): This command simulates typing into an input field. It works with any element that can receive keyboard input..Click(): This command simulates a mouse click. It triggers the same events as a user clicking would.Assert.IsTrue(...): This is our verification step. We check if a condition is true. If it's false, the test fails with the provided message.[TearDown]: This method runs after each test._driver.Quit()is essential for closing the browser and ending the WebDriver session gracefully.
The Test Pattern: AAA (Arrange-Act-Assert)
Our test follows the classic AAA pattern:
- Arrange: Navigate to the page and prepare the test environment.
- Act: Perform the actions we want to test (fill form, click login).
- Assert: Verify the expected outcome occurred.
Critical Flaw Alert
This script has a significant flaw that we'll address in upcoming lessons: it contains no explicit waits. It only works reliably because SauceDemo is a fast, simple application. In real-world applications with dynamic content, AJAX calls, and varying load times, this approach would result in flaky, unreliable tests.
For now, understand that this is a deliberate simplification. Professional automation requires sophisticated waiting strategies.
Understanding Browser Options and Configuration
While new ChromeDriver() works for basic scenarios, production automation often requires specific browser configurations. Let's explore some common options you'll encounter:
[SetUp]
public void Setup()
{
    // Configure Chrome options for different scenarios
    var chromeOptions = new ChromeOptions();

    // Run in headless mode (no visible browser window)
    // Useful for CI/CD pipelines
    chromeOptions.AddArgument("--headless");

    // Disable web security for testing (use cautiously)
    chromeOptions.AddArgument("--disable-web-security");

    // Set window size for consistent screenshots
    chromeOptions.AddArgument("--window-size=1920,1080");

    // Disable browser notifications
    chromeOptions.AddArgument("--disable-notifications");

    _driver = new ChromeDriver(chromeOptions);
}
Common Configuration Scenarios
- CI/CD Environments: Use headless mode and specific window sizes for consistent behavior.
- Development: Keep browser visible for debugging and observation.
- Screenshot Testing: Set exact window dimensions and disable animations.
Cross-Browser Testing Setup
You can easily switch between browsers by changing the driver initialization:
// Chrome
_driver = new ChromeDriver();

// Firefox
_driver = new FirefoxDriver();

// Edge
_driver = new EdgeDriver();
Each browser has its own options class (ChromeOptions, FirefoxOptions, EdgeOptions) for browser-specific configurations.
Locator Strategies – Beyond ID
While our first script uses ID locators (which are ideal when available), real-world applications often require more resilient and intention-driven locator strategies. Let's review the arsenal of tools at your disposal – mapped to the Locator Strategy Pyramid introduced in the Mastering Locators lesson:
The Locator Hierarchy
Listed top-down from most strategic to least maintainable:
- Test-Specific Attributes (Apex Tier):
By.CssSelector("input[data-test='username']")– Resilient contracts between developers and QAs. - ID (Excellent Tier):
By.Id("user-name")– Fast and reliable when available. - Meaningful CSS Class or Role Attribute (Good Tier):
By.ClassName("btn-primary"),By.CssSelector("[role='alert']")– Acceptable if tied to semantics. - Name Attribute (Situational Tier):
By.Name("username")- Good for form elements. - XPath for Text/Upward Traversal (Caution Tier):
By.XPath("//div[contains(text(), 'Epic sadface')]")- Most powerful but can be brittle. - Link Text / Partial Link Text (Caution Tier):
By.LinkText("Login"),By.PartialLinkText("Log")- For anchor tags. - Tag Name:
By.TagName("button")– Rarely used alone, too generic without pairing.
Real-World Locator Examples
// Apex Tier: Using data-test for resilience
IWebElement usernameField = _driver.FindElement(By.CssSelector("input[data-test='username']"));

// Excellent Tier: Stable ID
IWebElement passwordField = _driver.FindElement(By.Id("password"));

// Situational Tier: Functional attribute combination
IWebElement loginButton = _driver.FindElement(By.CssSelector("input[type='submit'][value='Login']"));

// Caution Tier: Text-based fallback with XPath
IWebElement errorMessage = _driver.FindElement(By.XPath("//div[contains(text(), 'Epic sadface')]"));
Locator Strategy Decision Tree
When choosing a locator strategy, ask yourself:
- Is there a test-specific attribute? → Use
By.CssSelector("[data-test='value']") - Is there a stable ID? → Use
By.Id() - Is there a semantic or role-based attribute? → Use
By.Name()orBy.CssSelector() - Do I need to match visible text? → Consider
By.XPath() - Is it a link? → Use
By.LinkText()orBy.PartialLinkText()
This approach helps future-proof your selectors and communicates intent clearly. Read more in The Locator Strategy Pyramid.
Hands-On Practice – Take the Controls
Your first mission is to get this script running on your own machine and then modify it to test a different scenario.
Task 1: Test the Locked Out User
- Open the
test-automation-space-csharp-coursesolution in Visual Studio. - Find the
01-basic-scriptproject and open theLoginTests.csfile. - Run the
SuccessfulLoginTestfrom the Test Explorer and watch it pass. Congratulations, you're an automator! - Now, modify the test. Change the username from
standard_usertolocked_out_user. The password is the same. - Run the test again. It will fail on the assertion, because you will not be redirected to the inventory page.
- Your goal: Modify the locator and the assertion to correctly verify that the error message "Epic sadface: Sorry, this user has been locked out." is displayed on the login page. (Hint: Use DevTools to find a good locator for the error message container!).
Task 2: Add Browser Configuration
Enhance your test setup with browser options:
- Modify your
Setup()method to useChromeOptions. - Add the
--start-maximizedargument to ensure consistent window size. - Run your test and observe the differences in browser behavior.
Task 3: Experiment with Different Locators
Practice locator strategy selection:
- Open SauceDemo in your regular browser and inspect the login elements.
- Find alternative locators for the username, password, and login button elements.
- Create a second test method that uses CSS selectors instead of IDs.
- Verify both approaches work correctly.
This exercise builds your locator strategy intuition and provides backup options when primary locators fail.
Common Pitfalls and Debugging Tips
Even with this simple script, you might encounter issues. Here are the most common problems and their solutions:
Problem 1: Element Not Found Exceptions
OpenQA.Selenium.NoSuchElementException: no such element: Unable to locate elementCauses and Solutions:
- Typo in locator: Double-check your ID strings for typos.
- Page not loaded: The element might not be ready when your code executes.
- Wrong locator strategy: The element might not have the expected ID.
Problem 2: Driver Version Mismatches
While Selenium Manager handles most cases, you might occasionally see:
session not created: This version of ChromeDriver only supports Chrome version XSolution: Update your Selenium.WebDriver NuGet package to the latest version.
Problem 3: Tests Passing Inconsistently
If your test passes sometimes but fails other times, you're experiencing the dreaded "flaky test" syndrome:
- Root cause: Racing conditions where your test code runs faster than the web page can respond.
- Immediate fix: Add
Thread.Sleep(2000);before assertions (not recommended for production). - Professional solution: Implement explicit waits (covered in the next lesson).
Debugging Strategies
- Add breakpoints: Pause execution to inspect the browser state.
- Take screenshots: Use
((ITakesScreenshot)_driver).GetScreenshot()to capture the page state. - Print page source: Use
Console.WriteLine(_driver.PageSource)to see the HTML. - Check browser console: Open DevTools manually to see JavaScript errors.
Key Takeaways
- Selenium WebDriver is a powerful API for controlling browsers programmatically, using the standardized W3C WebDriver Protocol that enables cross-browser compatibility.
- The client-server architecture (your code → driver → browser) creates a robust abstraction layer that supports multiple programming languages and browsers.
- Learning Selenium is a foundational and highly marketable skill that transfers to modern frameworks, even with the rise of newer tools like Playwright.
- The built-in Selenium Manager automatically handles browser driver management, eliminating a major historical setup pain point and version compatibility issues.
- A basic test follows the AAA pattern: Arrange (setup), Act (interact), and Assert (verify) the outcome.
- Proper setup (
[SetUp]) and cleanup ([TearDown]) are essential for creating reliable, independent tests that don't interfere with each other. - Locator strategy selection follows a hierarchy: test-specific attributes and ID are best, followed by name, CSS selectors, and XPath, with each having specific use cases.
- Browser configuration through options classes allows customization for different environments (development, CI/CD, headless execution).
Deepen Your Selenium Knowledge
- Selenium WebDriver Official Documentation The official source of truth for all things Selenium. An essential bookmark for any automation engineer.
- Selenium Manager Documentation The official guide explaining how the automatic driver management works.
- Sauce Demo Application The application under test. Explore it manually to understand its features before you automate them.
- W3C WebDriver Specification The technical specification that standardizes browser automation. Useful for understanding the protocol that powers Selenium.
- ChromeDriver Documentation Chrome-specific automation capabilities and troubleshooting guides. Essential for Chrome-focused testing.